Monthly Archives: April 2012

Creamy Corn Soup

brittle-mufffins 166

I’m so glad everyone loved Rach’s post as much as I did.

To keep it savory, I’m giving you a delicccious creamy corn soup recipe.  Creamed corn is delicious.  Probably because it’s the bad-for-you form of regular corn.  I’m okay with that.

If I can make an excuse to turn it into soup and make it into an acceptable meal, I will…and I did.

This is so good, especially with sweet cornbread (if you click on this link, please excuse the terrible pictures.) If you’re looking for a quick, but yummy meal, this is the one for you.

brittle-mufffins 173

brittle-mufffins 113

Creamy Corn Soup
All Recipes

Ingredients

  • 1/2 onion, chopped
  • 1 tablespoon garlic salt
  • 1 tablespoon margarine
  • 3 tablespoons all-purpose flour
  • 2 1/2 cups milk
  • 1 cup chicken broth
  • 2 (12 ounce) cans whole kernel corn
  • 2 1/2 tablespoons cream cheese
  • 1 teaspoon garlic salt
  • 1 teaspoon ground black pepper
  • ground cayenne pepper to taste

Directions

  1. In a large pot over medium heat, combine the onion, garlic, parsley and butter or margarine. Saute for about 5 minutes, or until onions are tender.
  2. Add the flour, stirring well, to make a pasty mixture. Whisk in the milk and the broth. Add the corn and the cream cheese and allow to heat through. Add the garlic salt, black pepper and cayenne pepper to taste. Stir together and serve.

brittle-mufffins 101

Guest Post: Rach’s Toasted Ravioli

I’m so lucky to have a delicious guest post from Rach at This Italian Family.  She is so sweet to do a post for me and was more than willing to help.  If you haven’t checked out her site, you need to… you won’t be able to quit reading it.  She and her family are so stinkin’ cute!  🙂

——————————————————————————————————————————————————————-

Hiya! I’m so excited to be guest posting for Katie today! She is just the sweetest and her recipes always look amazing. 🙂 Plus, can I just say how adorable she is? Check out that profile picture! Cute-ness! 🙂 So, when Katie asked if I would be willing to do a guest post for her, I immediately agreed.

Maybe I’m the only one who feels like this when guest posting, but I feel as if I must share the absolute most perfect recipe. I racked my brain and searched through all my favorite recipes trying to come up with just the perfect one to share. My absolutely two favorite foods are Spaghetti and Pizza so I thought I should probably share a recipe featuring one of those. But I couldn’t pick. It was like choosing between your children – you love them the same! Not that I have children or anything, but you get the idea. 😉

So, instead I decided on my favorite appetizer! Toasted Ravioli. Let’s just take a moment to consider the deliciousness that is toasted ravioli…

Gooey cheese inside a crispy shell dunked in your favorite marinara sauce. Delightful. 🙂

Okay, moment done because it is so time to share this recipe! I hope you guys love this as much as my husband and I do!

Toasted Ravioli

Ingredients:

6 eggs
3 cups all purpose flour
2 cups mozzarella cheese, cubed or grated
1 cup olive oil
1 cup parmesan cheese, grated

Directions:

1. Clean a large space on a table or countertop and mound the flour onto the surface. Make a well in the center of the flour and crack your eggs directly into it. I know that sounds crazy, but just trust me. If you absolutely must use a bowl, pick a large one so you have plenty of space to work. Then, (this is where it gets a little messy) slowly mix the flour and eggs together with your hands or a wooden spoon until it all comes together.

2. Flour your surface (or a new one if your area got too messy) and knead the dough until it is smooth and pliable (you are likely to need to add more flour). If you had a Kitchenaid mixer with a dough hook, this would be a great time to pull it out. It is kind of cheating, but kind of not since the end result will be the same: delicious, crunchy, gooey ravioli… but I’m getting ahead of myself.

3. Allow dough to rest for 5-10 minutes then begin to roll it out. If you have a pasta maker then you are in luck, my friend! Rolling it out is quick and painless. If you don’t have one then you can do what my husband and I did the first couple of years before we owned a pasta maker – roll it out by hand.  The trick to this, is to roll it out as thinly as possible with your rolling pin because the pasta will plump up significantly after it goes in the water.

4. Slice dough into 3” x 6” strips. Take one dough strip and fold in half. Seal two edges (third edge should just be a fold in the dough). Open the pocket and put approximately 1 tsp of mozzarella cheese in the center. Seal the forth side with a fork or wooden spoon. Place each ravioli on a platter/cookie sheet/large surface until you can finish the rest. Repeat with next dough strip until all are complete.

5. Bring a large pot of salted water to boil. Add a little olive oil and then 7-9 raviolis. After 2-3 minutes, the raviolis should rise to the surface and are ready to be pulled out with a slotted spoon. Place boiled raviolis in a bowl and coat with olive oil and parmesan. Repeat with the rest of the ravioli until all have been boiled and coated.

6. Heat a generous amount of olive oil in a large frying pan over medium heat. Lay a single layer of raviolis on the pan and fry until they are brown on both sides (3-6 minutes per side). Serve hot with marinara sauce and prepare yourself for a moment of bliss as you take your first bite. 🙂

I know this recipe looks crazy long, but trust me, it’s not so bad. And really, how many of your friends can say they’ve made their own pasta from scratch? 😉 Cheers!

 

Tropical Traditions Organic Honey Winner


Congratulations to Mary Myers for winning the honey!!

Check back within the next few weeks for some recipes and a review of the honey from me.

It’s going to be a hectic next couple of weeks because my classes are just now winding down. Which means I have millions of projects to complete and tests to study for, so I’ll be having guest posts.  They’re going to be good ones!

After that, I’ll be posting more frequently. Bear with me. 🙂

Food Photography: From Snapshots to Great Shots Book Review

Photo from: Amazon

As a food blogger, it is very important to know how to take a good food photograph.

I remember when I first started this blog… my photography skills were terrible and I still couldn’t figure out why I didn’t have any followers.  Knowing the ins and outs of food photography is that important: the difference between having followers and not having followers.   Once I figured this out, I signed up for a photography class and saved up to by a nice camera, and it was so worth it.

Two years later and I’m still learning new things every day about photography.  When I received the book Food Photography: From Snapshots to Great Shots, I was extremely excited.  There are so many things about food photography that you don’t even think about; it’s different from any other kind of photography because you have to make someone want to eat what you’re shooting and style the food correctly.  There’s so much behind it and Nicole Young, the author of the book, captures every single aspect of it perfectly.  You’ll learn so much by reading it, whether you’re a beginner or an expert.  For only 15 dollars, you can learn everything you need to know about food photography.  It’s highly recommended by me. 

You know that moment when your food arrives at the table, and it looks
so good you want to take a picture of it? Or do you have a food blog
that you’d like to enhance with better visuals? Do you want to create
photos that conjure up the flavors of your favorite foods but lack the
photographic technique to make it happen? Then you want to read this
book.
In Food Photography: From Snapshots to Great Shots, photographer
Nicole Young dishes up the basics on getting the right camera equipment
– lights, lenses, reflectors, etc. – and takes you through the key
photographic principles of aperture, ISO, and shutter speed. She then
discusses lighting and composition and shoes how to style food using
props, fabrics, and tabletops. Finally, she explains how to improve your
photos through sharpening, color enhancement, and other editing
techniques. 
Follow along with your friendly and knowledgeable guide, photographer
and author Nicole S. Young, and you will:
.    Use your camera’s settings to gain full control over the look and
 feel of your images
.    Master the photographic basics of composition, focus, depth of
field, and much more
.    Learn to enhance your food photographs using professional food
styling techniques
.    Get tips on different types of lighting, including strobes,
flashes, and natural light
.    Improve the look of your photos using Adobe Photoshop
And once you’ve got the shot, show it off! Join the book’s Flickr
group to share your photos, recipes, and food photography tips at
flickr.com/groups/foodphotographyfromsnapshotstogreatshots.
(From: Newman Communications)

Just to let you know how terrible my food photography used to be, here’s a few pictures from “before”:

Peach Bread Pudding

Sunday Morning Sticky Buns

Pumpkin Muffins

Okay, that’s enough.  I think you guys get the point… embarrassing!  If I can improve, anyone can. 🙂

Where did you learn your food photography tips?

Homemade Egg Sausage Breakfast Tortilla

burrito4
Do you guys use Picnik for your photo editing?

I’m so sad that they’re shutting down on Thursday.  Looks like I’m going to have to find a new editing program.

What photo editing software do you guys use?

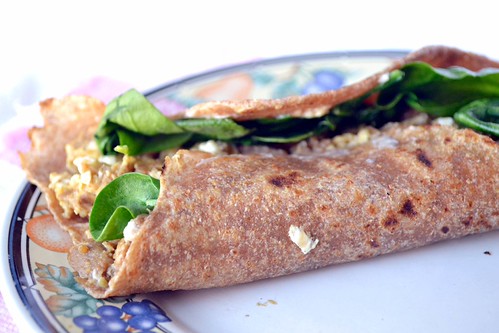
Anyway, back to business…these breakfast burritos are awesome!  And they’re healthy.  If I could eat them every day, I would.  Sadly, I live in the dorms and I have a meal plan so I have to eat in the university cafeteria for meals.

If you don’t have a meal plan at a dorm, then you should eat these every day for breakfast.

burrito5


burrito3

burrito2

burrito

Homemade Egg Sausage Breakfast Tortillas
I made mine with Morningstar Farms Vegetable Crumbles, but you can make yours with sausage if you want.

Ingredients:

1 whole wheat tortilla
1/2 cup Vegetable Crumbles or sausage
1 egg
1/2 cup spinach
1 weight watchers white cheddar wedge 

Directions:

  1. Cook the sausage until browned.
  2. Add in the egg.
  3. Use a spatula to mix the egg and sausage until the egg is cooked.
  4. Microwave tortilla for 10 seconds.
  5. Spread the cheddar wedge on the tortilla, layer spinach, and egg & sausage mixture on top.
  6. Fold and eat!

Don’t forget to enter my giveaway for Tropical Traditions Organic Raw Honey!!!

burrito1

GIVEAWAY: Tropical Traditions Organic Raw Honey

Hey guys!

Tropical Traditions is hosting another giveaway for me.  Aren’t they awesome?  This time it’s Organic Raw Honey.

I’ve never tried raw honey before, but as soon as I receive a sample, I’ll come up with a recipe for you all.

Until then, here are some delicious recipes from the Tropical Traditions blog.  My two favorites are the Grain-Free Honey Graham Cracker Pie Crust and Honey Caramels with Chocolate, Almond and Coconut.

If you’ve never heard of Tropical Traditions before, it’s the best place to get Virgin Coconut Oil. And if you don’t know what Virgin Coconut Oil is, Tropical Traditions does a good job of explaining it.

The only requirement to enter is to:

Subscribe to Tropical Traditions newsletter and leave a comment saying you did so.

And don’t forget to leave your e-mail address so I can reach you if you win.

The giveaway will end on Monday, April 23 at 12 pm.

GOOD LUCK! 🙂

Whole Wheat Tortillas from Scratch

tortilla6

Sometimes I don’t like buying packaged items from the store just because I don’t know what goes into them.

Most of the time, I don’t worry about it, but when I get the chance, I try to recreate store-bought food items.

For example, these tortillas.

I had no idea how easy it is to make homemade tortillas.  Only 4 ingredients, super easy to make, and so healthy!  These are the way to go.

I got this recipe from 100 Days of Real Food and I recommend it 100%.

Check out the next post for another awesome giveaway.

tortilla7


tortilla5


tortilla4

tortilla3

tortilla

Whole-Wheat Flour Tortillas
From: 100 days of real food 

YIELD: 12 TORTILLAS

INGREDIENTS

DIRECTIONS

  1. In the bowl of a mixer set with a dough hook (or paddle), pour in the flour, oil and salt.
  2. Beat with the dough hook until crumbly, about 3 to 5 minutes. Scrape the sides as needed.
  3. With the mixer running, gradually add the warm water and continue mixing until the dough is smooth, about 3 minutes.
  4. Take out the dough and divide it into 12 equal sized pieces.
  5. Using the palms of your hand roll each piece into a round ball and flatten it out on a baking tray or board. Cover with plastic wrap and let rest at room temperature for at least 15 minutes or up to one hour.
  6. Heat a cast iron skillet, griddle or 12-inch skillet over med-high heat. The pan should be fairly hot before you begin cooking the tortillas.
  7. On a lightly floured board or counter top, use a rolling pin to turn each ball into a 8 to 10 inch flat circle. Be careful not to use more than a teaspoon or two of flour when rolling out each ball into a tortilla because too much excess flour will burn in the pan.
  8. Grease the pan with a touch of oil and then carefully transfer each tortilla, one at a time, to the pan and cook until puffy and slightly brown, about 30 to 45 seconds per side.
  9. Set aside on a plate to cool slightly. Refrigerate or freeze. (I left mine out at room temperature and they were fine for a week.)

tortilla2

What’s your favorite store-bought food you like to recreate?

Easter Lemon Cake with Whipped Frosting

easter2

As I started to make this cake, I realized that I didn’t have two cake pans.  I also realized that I didn’t know how I was going to make this cake Easter themed.

That’s when I thought, “Well, why not make cupcakes and set them on top?”  It solved both of my problems!

The flower for Easter and the cupcakes to make up for my missing cake pan.

The cake is super light and fluffy, which goes great with the lemon flavor and the frosting is heavenly.  It’s the perfect light cake for Easter.

Also, I have a surprise for you guys!  The awesome people at Tropical Traditions are letting me do another giveaway.  Except this time, you guys get to pick what you want.

Pick from the following list and leave a comment letting me know what you’d like for the next giveaway:

Household Products:
•       All Purpose Household Cleaner – http://www.householdtraditions.com/all_purpose_non_toxic_household_cleaner.htm
•       Dish Liquid – http://www.householdtraditions.com/dish_liquid.htm
•       Dishwasher Detergent – http://www.householdtraditions.com/powdered_dishwasher_detergent.htm
•       Glass and Surface Cleaner – http://www.householdtraditions.com/glass_surface_cleaner.htm
•       Laundry Detergent – http://www.householdtraditions.com/laundry_detergent.htm
•       Oxygen Bleach – http://www.householdtraditions.com/oxygen_bleach.htm

Foods:
•       Atchara – http://www.tropicaltraditions.com/atchara.htm
•       Coconut Cream Concentrate – http://www.tropicaltraditions.com/coconut_cream_concentrate.htm
•       Coconut Flour – http://www.tropicaltraditions.com/organic_coconut_flour.htm
•       Coconut Chips, Coconut Flakes, or Shredded Coconut – http://www.tropicaltraditions.com/organic_dried_coconut.htm
•       Coconut Water Vinegar – http://www.tropicaltraditions.com/organic_coconut_water_vinegar.htm
•       Palm Shortening – http://www.tropicaltraditions.com/organic_palm_shortening.htm
•       Raw Honey – http://www.tropicaltraditions.com/organic_raw_honey.htm
•       Whole Golden Flaxseed – http://www.tropicaltraditions.com/organic_whole_flaxseed.htm
•       Whole Grains (Whole Grains only, flours unavailable for review.) – http://www.tropicaltraditions.com/organic_grains.htm
•       Virgin Coconut Oil Book or eBook – Includes 85 recipes! (Please indicate preference) – http://www.tropicaltraditions.com/book_virgin_coconut_oil.htm

Health & Beauty:
•       Antioxidant Omega 3 Greens (Please indicate preferred flavor) – http://www.tropicaltraditions.com/antioxidant_omega3_natural_greens.htm
•       Gold Label Virgin Coconut Oil Hair Treatment – http://www.tropicaltraditions.com/virgin_coconut_oil_for_hair_treatment.htm
•       Hair Oils (Please let me know which scent.) – http://www.tropicaltraditions.com/organic_hair_oils.htm
•       Herbal Breath Spray – http://www.tropicaltraditions.com/organic-herbal-breath-spray.htm
•       Skin Care Products (Please indicate which individual product & preferred scent) – http://www.tropicaltraditions.com/organic_skin_care_products.htm

Have a Happy Easter! 🙂

easter6

easter5

easter4

easter2

Easter Lemon Cake with Whipped Frosting
From: Martha Stewart 

Ingredients

  • 1/2 cup margarine or butter
  • 1/2 cup coconut oil or vegetable oil
  • 2 1/2 cups all-purpose flour (spooned and leveled), plus more for pans
  • 1/2 teaspoon baking powder
  • 1/2 teaspoon baking soda
  • 1 teaspoon salt
  • 1 tablespoon lemon zest
  • 2 cups sugar
  • 2 large eggs plus 3 large egg yolks
  • 1/4 cup plus 2 tablespoons  lemon juice
  • 1 cup buttermilk
  • Whipped frosting

Directions

  1. Preheat oven to 350 degrees.
  2. Important: Butter and flour two 8-by-2-inch cake pans, tapping out excess flour. )I didn’t put enough and mine got stuck)
  3. In a medium bowl, whisk flour, baking powder, baking soda, salt, and lemon zest.
  4. In a large bowl, using an electric mixer, beat butter and 1 1/2 cups sugar until light and fluffy.
  5. With mixer on low, beat in eggs and yolks, one at a time.  Beat in 2 tablespoons lemon juice. Alternately beat in flour mixture and buttermilk beginning and ending with flour mixture; mix just until combined.
  6. Divide batter between cake pan and cupcake tins; smooth tops.
  7. Bake until cakes pull away from sides of pans, cake- 32 to 35 minutes, cupcakes- about 15 minutes.
  8. Let cool in pans 10 minutes. Run a knife around edges of pans and invert cakes onto a wire rack.
  9. While cakes/cupcakes are baking, bring remaining 1/2 cup sugar and 1/2 cup water to a boil in a saucepan.
  10. Simmer 25 minutes. Stir remaining 1/4 cup fresh lemon juice into syrup.
  11. Using a fork, poke holes in warm cakes on rack. Brush with lemon syrup. Let cool completely.
  12. Prepare frosting, substituting 2 tablespoons fresh lemon juice for vanilla extract.
  13. Top cake with cupcakes and frost.

easter

Copycat Mother’s Circus Animal Cookies

mothers3

When I was a kid, I used to love Mother’s Circus Animal Cookies.

I used to pride myself in elementary school for being such a good “sharer” since I was an only child.  However, apparently sharing doesn’t count when it comes to Mother’s cookies.

One of my friends had to stay at my house in 4th grade for a week because her mom was having surgery.  My mom packed our lunches in the morning, and when I got to lunch, my friend had Mother’s cookies in her lunchbox and I did not.

I was so mad that I didn’t talk to my friend the rest of the day… as if it was her fault that my mom packed her the cookies.

So, moral of the story=Mother’s cookies are too good to share, so make sure you have enough.  And if you don’t have enough, you can now make them!

For the recipe, click here: Dessert First Girl.

These are so good.  I brought them to my nieces and they devoured them.

mothers6

mothers4

mothers2

mothers

Sorry for the lack of posts this week, but make sure you check back to read my next post because I have a super cute Easter recipe for you guys and an awesome surprise. 🙂

What was the one snack you wouldn’t share as a kid?


mothers5