Monthly Archives: August 2011

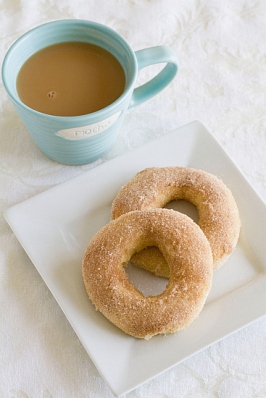
Vanilla Cinnamon Donuts with Vanilla Cinnamon Glaze

When I was exploring my town the other day, I found a cute little donut pan!  They’re all over the blogosphere and I’m probably the last to jump on the donut pan train, but I finally did!!

Reasons why you should get a donut pan:

1.  They make donuts healthier.  Donuts are usually deep-fried, but with a donut pan, you can bake them!
2.  All of these delicious baked donut recipes:


Brown Eyed Baker’s Baked Donuts with Cinnamon Sugar:


Mama Pea’s Chocolate Glazed Cake Donuts:


Amy’s Baked Chocolate Donuts:


Megan’s Strawberry Doughnuts:


Katie’s Cake Batter Donuts:


Got No Milk’s Blueberry (Dairy Free) Donuts:


Angela’s Chocolate Chip Cookie Dough Glazed Doughnuts:


Don’t those all look so good???

The donuts I made were so awesome!  They were moist and vanilla-y witch just a hint of cinnamon.  The glaze was the BOMB, too!

Vanilla Cinnamon Donuts with Vanilla Cinnamon Glaze
Adapted from: The White Library

Ingredients:

2 cups all purpose flour
¼ cup granulated sugar

¼ cup brown sugar
1 tsp baking powder
2 eggs,beaten
½ cup milk
1 tsp vanilla extract
4 tsp vegetable oil
4 tbsp applesauce

1 tsp cinnamon


Directions:
1. Preheat oven to 325 F. Whisk flour and baking powder in a medium bowl, then combine with sugar.
2. Beat egg one at a time with milk, oil, applesauce, cinnamon, and vanilla extract until well blended. Then combine with flour mixture.  Mix vigorously until well blended.
3. Lightly spray donut pan with cooking spray. Pour batter into molds up to 2/3 full. *Optional: Sprinkle the unbaked donuts with brown sugar before baking.
4. Bake 10 -15 minutes or until tops spring back when lightly touched and donuts are golden brown. 
5. Remove from oven and let cool down before glazing.


Glaze:


Ingredients:

  • 1 cup confectioner’ s sugar
  • 1 ½ tbsp. milk
  • ½ tsp. vanilla extract
  • 1 tsp. cinnamon 

Directions:
In small bowl, stir together sugar, milk, cinnamon, and vanilla extract until sugar is completely dissolved. If mixture is too thick, add a little more milk. If too thin, add more sugar.  You can add a couple of drops of food coloring for different colored glazes. Dip top of donuts in glaze and let the glaze set and dry before serving.


Vanilla Cinnamon Donuts with Vanilla Cinnamon Glaze

When I was exploring my town the other day, I found a cute little donut pan!  They’re all over the blogosphere and I’m probably the last to jump on the donut pan train, but I finally did!!

Reasons why you should get a donut pan:

1.  They make donuts healthier.  Donuts are usually deep-fried, but with a donut pan, you can bake them!
2.  All of these delicious baked donut recipes:


Brown Eyed Baker’s Baked Donuts with Cinnamon Sugar:


Mama Pea’s Chocolate Glazed Cake Donuts:


Amy’s Baked Chocolate Donuts:


Megan’s Strawberry Doughnuts:


Katie’s Cake Batter Donuts:


Got No Milk’s Blueberry (Dairy Free) Donuts:


Angela’s Chocolate Chip Cookie Dough Glazed Doughnuts:


Don’t those all look so good???

The donuts I made were so awesome!  They were moist and vanilla-y witch just a hint of cinnamon.  The glaze was the BOMB, too!

Vanilla Cinnamon Donuts with Vanilla Cinnamon Glaze
Adapted from: The White Library

Ingredients:

2 cups all purpose flour
1/4 cup granulated sugar

1/4 cup brown sugar
1 tsp baking powder
2 eggs,beaten
1/2 cup milk
1 tsp vanilla extract
4 tsp vegetable oil
4 tbsp applesauce

1 tsp cinnamon


Directions:
1. Preheat oven to 325 F. Whisk flour and baking powder in a medium bowl, then combine with sugar.
2. Beat egg one at a time with milk, oil, applesauce, cinnamon, and vanilla extract until well blended. Then combine with flour mixture.  Mix vigorously until well blended.
3. Lightly spray donut pan with cooking spray. Pour batter into molds up to 2/3 full. *Optional: Sprinkle the unbaked donuts with brown sugar before baking.
4. Bake 10 -15 minutes or until tops spring back when lightly touched and donuts are golden brown. 
5. Remove from oven and let cool down before glazing.


Glaze:


Ingredients:

  • 1 cup confectioner’ s sugar
  • 1 1/2 tbsp. milk
  • ½ tsp. vanilla extract
  • 1 tsp. cinnamon 

Directions:
In small bowl, stir together sugar, milk, cinnamon, and vanilla extract until sugar is completely dissolved. If mixture is too thick, add a little more milk. If too thin, add more sugar.  You can add a couple of drops of food coloring for different colored glazes. Dip top of donuts in glaze and let the glaze set and dry before serving.


Coconut Cream Cheese Balls (AKA Heaven)

I love my new town!

It’s full of Victorian houses, side roads filled with gravel, a cute little downtown of “mom and pop” stores, greenery everywhere, etc.  But, the best part about it is the feeling I get when I drive around the area.  For me, it’s a sort of nostalgic feeling.  I couldn’t describe it myself, so I looked it up and I think this is perfect: I think it’s the feeling you get when you are overwhelmed with passion and longing for the favorite things from your youth. And the satisfaction you get when you re-live them.”

I spent my Saturday exploring and just taking it all in.  Please indulge me and check these out (all via Google… none of these are mine):

To top off all this goodness, I made my moms Coconut Cream Cheese Balls.  They are the best quick and easy dessert ever. I’m not exaggerating.  Unless you don’t like cream cheese or coconut, you will agree with me and I guarantee that.  These are heaven in a small bite-sized ball.  Please try them… they won’t disappoint you!

What do you guys love about your town?
Give links to your favorite fast and easy desserts!

Coconut Cream Cheese Balls

Ingredients:
1 8 oz. block of cream cheese, room temperature
5 cups powdered sugar (*If you don’t want these super sweet, sub ½ cup flour for 1 cup powdered sugar)
1-2 cups shredded coconut
1 teaspoon vanilla
*1 cup pecans, optional

Directions:
1. Beat the cream cheese until it’s smooth.
2. Slowly, cup by cup, beat in the powdered sugar, until it reaches a semi-doughy consistency.  It will be a bit gooey, but still hold it’s shape when formed into a ball.
3. Beat in vanilla.  If using pecans, fold them in now.
4. Roll each ball in the coconut.
5. Chill for about an hour before serving.

Coconut Cream Cheese Balls (AKA Heaven)

I love my new town!

It’s full of Victorian houses, side roads filled with gravel, a cute little downtown of “mom and pop” stores, greenery everywhere, etc.  But, the best part about it is the feeling I get when I drive around the area.  For me, it’s a sort of nostalgic feeling.  I couldn’t describe it myself, so I looked it up and I think this is perfect: I think it’s the feeling you get when you are overwhelmed with passion and longing for the favorite things from your youth. And the satisfaction you get when you re-live them.”

I spent my Saturday exploring and just taking it all in.  Please indulge me and check these out (all via Google… none of these are mine):

To top off all this goodness, I made my moms Coconut Cream Cheese Balls.  They are the best quick and easy dessert ever. I’m not exaggerating.  Unless you don’t like cream cheese or coconut, you will agree with me and I guarantee that.  These are heaven in a small bite-sized ball.  Please try them… they won’t disappoint you!

What do you guys love about your town?
Give links to your favorite fast and easy desserts!

Coconut Cream Cheese Balls

Ingredients:
1 8 oz. block of cream cheese, room temperature
5 cups powdered sugar (*If you don’t want these super sweet, sub 1/2 cup flour for 1 cup powdered sugar)
1-2 cups shredded coconut
1 teaspoon vanilla
*1 cup pecans, optional

Directions:
1. Beat the cream cheese until it’s smooth.
2. Slowly, cup by cup, beat in the powdered sugar, until it reaches a semi-doughy consistency.  It will be a bit gooey, but still hold it’s shape when formed into a ball.
3. Beat in vanilla.  If using pecans, fold them in now.
4. Roll each ball in the coconut.
5. Chill for about an hour before serving.

Chocolate Chip Cookie Dough Ball Bites

I’m taking a Digital Media class right now and loving it.  I’m learning so much.

We have to “make a blog” for an assignment.  Unfortunately, when someone asked “Do we have to make a new blog if we already have one?” my professor said yes.  So I have to create a new blog.  My idea is to make a blog that relates to this one and have a tab that sends you to my new one.  The only problem is that I have no idea what I could do that would relate to this.  Please give me ideas! 🙂

Today, we talked about keywords and I found the lesson really helpful for bloggers who use advertising on their sites, so I’m going to give you a few tips that I learned today.

  1. Be general, yet very specific.  How helpful, right? Ha! What this means is that when using a label or keyword, use more than one and make one super broad and the other super specific.  That way, you’ll (to  put it how my professor put it) “stand out as the bright fish in the millions of fish caught in the net." 
  2. Use Google’s Keyword Tool.  Use your resources!  This is an easy tool that helps sort which keywords you should use and which ones you shouldn’t.
  3. Use the keywords in the labels/keywords section and in the header, body, and even your URL.  Don’t just save the keywords for the keyword section.  Use them as much as possible!  
  4. Realize how important keywords are.  Without keywords, your blog won’t get recognized.  You may have really good content, but no way to get recognized because your keywords aren’t very good.
  5. Use keywords with a high CPC.  CPC is the cost per click.  The more clicks you get on your ads, the more money you make, so the CPC is something you should be checking out.  You can check that here and here
  6. Use this site to analyze what keywords other websites are using.  Use the URL’s of big websites to see what they use to get recognized.
If you all have any ideas for a "sister” site to What Katie’s Baking, I’d absolutely love to hear them!


What other keyword tips do you have?

Chocolate Chip Cookie Dough Ball Bites
Adapted from: Joy the Baker

Ingredients: 


2 cups all purpose flour
½ teaspoon baking soda (i know we’re not baking them, it’s for flavor)
¾ teaspoons salt
½ cup brown sugar
1/3 cup granulated sugar
1 teaspoon vanilla extract
1/3 cup Greek yogurt or applesauce or peanut butter
1 ½ cup semi sweet chocolate chips
1 ½ cups milk chocolate chips, melted for dipping

1 stick (½ cup or 4 ounces) unsalted butter at room temperature
Directions:

  1. In the bowl of a stand mixer fit with a paddle attachment (or with a large bowl and a wooden spoon) cream butter and sugars until light and fluffy, about three minutes in the machine.  Beat in yogurt or applesauce or peanut butter along with the vanilla extract and stir to combine. (I used applesauce, but peanut butter would be so good!)
  2. Whisk together the flour, baking soda and salt.  Add all at once to the butter and sugar mixture and stir until incorporated.  Fold in chocolate chips.
  3. Scoop large spoonfuls or ice cream scoops onto a  waxed paper lined cookie sheet.  Spear each dough ball with a cute plastic fork, Popsicle stick, or cut-up straw.  Place in the freezer overnight or until frozen, at least three hours.
  4. When ready to dip the balls, melt chocolate chips in a small saucepan over a low flame or in the microwave.  Remove balls from the freezer and dip into warm chocolate.  Return to the lined cookie sheet and return to the freezer to harden.  Serve cold from the freezer.

Chocolate Chip Cookie Dough Ball Bites

I’m taking a Digital Media class right now and loving it.  I’m learning so much.

We have to “make a blog” for an assignment.  Unfortunately, when someone asked “Do we have to make a new blog if we already have one?” my professor said yes.  So I have to create a new blog.  My idea is to make a blog that relates to this one and have a tab that sends you to my new one.  The only problem is that I have no idea what I could do that would relate to this.  Please give me ideas! 🙂

Today, we talked about keywords and I found the lesson really helpful for bloggers who use advertising on their sites, so I’m going to give you a few tips that I learned today.

  1. Be general, yet very specific.  How helpful, right? Ha! What this means is that when using a label or keyword, use more than one and make one super broad and the other super specific.  That way, you’ll (to  put it how my professor put it) “stand out as the bright fish in the millions of fish caught in the net.” 
  2. Use Google’s Keyword Tool.  Use your resources!  This is an easy tool that helps sort which keywords you should use and which ones you shouldn’t.
  3. Use the keywords in the labels/keywords section and in the header, body, and even your URL.  Don’t just save the keywords for the keyword section.  Use them as much as possible!  
  4. Realize how important keywords are.  Without keywords, your blog won’t get recognized.  You may have really good content, but no way to get recognized because your keywords aren’t very good.
  5. Use keywords with a high CPC.  CPC is the cost per click.  The more clicks you get on your ads, the more money you make, so the CPC is something you should be checking out.  You can check that here and here
  6. Use this site to analyze what keywords other websites are using.  Use the URL’s of big websites to see what they use to get recognized.
If you all have any ideas for a “sister” site to What Katie’s Baking, I’d absolutely love to hear them!


What other keyword tips do you have?

Chocolate Chip Cookie Dough Ball Bites
Adapted from: Joy the Baker

Ingredients: 


2 cups all purpose flour
1/2 teaspoon baking soda (i know we’re not baking them, it’s for flavor)
3/4 teaspoons salt
1/2 cup brown sugar
1/3 cup granulated sugar
1 teaspoon vanilla extract
1/3 cup Greek yogurt or applesauce or peanut butter
1 1/2 cup semi sweet chocolate chips
1 1/2 cups milk chocolate chips, melted for dipping

1 stick (1/2 cup or 4 ounces) unsalted butter at room temperature
Directions:

  1. In the bowl of a stand mixer fit with a paddle attachment (or with a large bowl and a wooden spoon) cream butter and sugars until light and fluffy, about three minutes in the machine.  Beat in yogurt or applesauce or peanut butter along with the vanilla extract and stir to combine. (I used applesauce, but peanut butter would be so good!)
  2. Whisk together the flour, baking soda and salt.  Add all at once to the butter and sugar mixture and stir until incorporated.  Fold in chocolate chips.
  3. Scoop large spoonfuls or ice cream scoops onto a  waxed paper lined cookie sheet.  Spear each dough ball with a cute plastic fork, Popsicle stick, or cut-up straw.  Place in the freezer overnight or until frozen, at least three hours.
  4. When ready to dip the balls, melt chocolate chips in a small saucepan over a low flame or in the microwave.  Remove balls from the freezer and dip into warm chocolate.  Return to the lined cookie sheet and return to the freezer to harden.  Serve cold from the freezer.

Baking: College Edition. Brownie Cookie Sandwich

Learning names can be SO HARD when you’re meeting a million people.  Luckily, you’re never too old to play games.  Even as a junior in college, two of my teachers have already had us play games to learn everyone’s name in the classes.
Game number one:  Each student has to think of an adjective that describes them and starts with the first letter of their first name.  Then everyone says their name and adjective out loud (Kind Katie) and the names and adjectives of all of the people who went before them.  Pretty effective.
Game number two: Everyone gets a miniature dry erase board and marker.  They have to write their name at the top and then below draw something that everyone can remember them by.  Then everyone holds up their board to the class and describes what they drew.  My drawing sucked but I tried to draw my blog.  Also effective.
My first week of classes has been consumed by learning names and way too many syllabus’ (syllabi?).  I haven’t been able to sleep very well so if anyone has any tips on sleeping they’d be greatly appreciated!!
I also had my first baking experience at school!  I prepared everything in the room (everything but the actual baking part).  My roomies weren’t really phased by that because they already know about my blog, but when I went down to the commons area to put the cookies in the oven, it got a lil’ awkward.  The kitchen was packed with people hanging out so they were all grilling me about what I was doing.  But I kept on bakin’ on and made these yummmyy cookie sandwiches with packaged frosting and a box mix. (My roommate brought them for me because she knew I had a blog :)) 

What do you guys think about box mixes and packaged frosting?

I hate them both.  Buuuttt… they’re cheap and easy.  And I’m a college student now, ya know.  Let’s be cliche here and go with it.  
These were so good.  They reminded me of oatmeal cream pies.  The texture was exactly the same… that soft and chewy cookie with the whipped, creamy filling, but the flavor was even better than oatmeal cream pies!  They’re really decadent, but so worth it and so cheap.  I can’t believe I’m saying this, but I highly recommend these, processed chemicals and all. 
What do you do when you can’t sleep
Do you use boxed mixes?
Brownie Cookie Sandwiches

Ingredients:

Directions:

  1. Preheat oven to 375 ºF. Grease cookie sheet.
  2. Combine brownie mix, egg, water and oil in large bowl. Stir until well blended and soft dough forms. Drop by level measuring tablespoons about 2 inches apart onto greased cookie sheet.
  3. Bake at 375 ºF for 7 to 8 minutes or until cookies are set in center. Do not over bake. Cool for 1 minute before removing to cooling rack. Cool completely before assembling.
  4. Spread frosting on half the cookies. Top each frosted cookie with another cookie. Gently press together.

Salted Brown Butter Rice Krispie Treats

Rice Krispie treats remind me of school.

When I was little, my elementary school was right around the corner from my house.  My neighbor and I would walk home from school every day and eat an after school snack.  7 out of 10 times Rice Krispie Treats would be involved.

Now, as an “adult” (according to society at least), Rice Krispies are a comforting snack for me because of my childhood memories.  Thanks to Deb, I can make Salted Brown Butter Rice Krispie Treats and feel like I’m playing my adult role… since brown butter is sophisticated and all. And only adults add salt to stuff because they we like to have high cholesterol and hypertension.

If you’re still a kid at heart, these still taste de-freakin’-licious!  I like the hint of salt blended with the sweetness of the marshmallows and you can even taste the nuttiness of the brown butter.  Perfect snack for kids and adults!

What was your after school snack?


Salted Brown Butter Rice Krispie Treats
Smitten Kitchen 
Makes 16 2-inch squares or 32 1- x 2-inch small bars

Ingredients:
4 ounces (1 stick) unsalted butter
1 10-ounce bag marshmallows
Heaping ¼ teaspoon coarse sea salt
6 cups Rice Krispies cereal (about half a 12-ounce box)

Directions:

  1. Butter (or coat with non-stick spray) an 8-inch square cake pan with 2-inch sides.
  2. In a large pot, melt butter over medium-low heat. It will melt, then foam, then turn clear golden and finally start to turn brown and smell nutty. Stir frequently, scraping up any bits from the bottom as you do. Don’t take your eyes off the pot as while you may be impatient for it to start browning, the period between the time the butter begins to take on color and the point where it burns is often less than a minute.
  3. As soon as the butter takes on a nutty color, turn the heat off and stir in the marshmallows. The residual heat from the melted butter should be enough to melt them, but if it is not, turn it back on low until the marshmallows are smooth.
  4. Remove the pot from the stove and stir in the salt and cereal together. Quickly spread into prepared pan. I liked to use a piece of waxed or parchment paper that I’ve sprayed with oil to press it firmly and evenly into the edges and corners, though a silicon spatula works almost as well.
  5. Let cool, cut into squares.

P.S. Check out Karly. She’s featured in a book! How cool is that?

Salted Brown Butter Rice Krispie Treats

Rice Krispie treats remind me of school.

When I was little, my elementary school was right around the corner from my house.  My neighbor and I would walk home from school every day and eat an after school snack.  7 out of 10 times Rice Krispie Treats would be involved.

Now, as an “adult” (according to society at least), Rice Krispies are a comforting snack for me because of my childhood memories.  Thanks to Deb, I can make Salted Brown Butter Rice Krispie Treats and feel like I’m playing my adult role… since brown butter is sophisticated and all. And only adults add salt to stuff because they we like to have high cholesterol and hypertension.

If you’re still a kid at heart, these still taste de-freakin’-licious!  I like the hint of salt blended with the sweetness of the marshmallows and you can even taste the nuttiness of the brown butter.  Perfect snack for kids and adults!

What was your after school snack?


Salted Brown Butter Rice Krispie Treats
Smitten Kitchen 
Makes 16 2-inch squares or 32 1- x 2-inch small bars

Ingredients:
4 ounces (1 stick) unsalted butter
1 10-ounce bag marshmallows
Heaping 1/4 teaspoon coarse sea salt
6 cups Rice Krispies cereal (about half a 12-ounce box)

Directions:

  1. Butter (or coat with non-stick spray) an 8-inch square cake pan with 2-inch sides.
  2. In a large pot, melt butter over medium-low heat. It will melt, then foam, then turn clear golden and finally start to turn brown and smell nutty. Stir frequently, scraping up any bits from the bottom as you do. Don’t take your eyes off the pot as while you may be impatient for it to start browning, the period between the time the butter begins to take on color and the point where it burns is often less than a minute.
  3. As soon as the butter takes on a nutty color, turn the heat off and stir in the marshmallows. The residual heat from the melted butter should be enough to melt them, but if it is not, turn it back on low until the marshmallows are smooth.
  4. Remove the pot from the stove and stir in the salt and cereal together. Quickly spread into prepared pan. I liked to use a piece of waxed or parchment paper that I’ve sprayed with oil to press it firmly and evenly into the edges and corners, though a silicon spatula works almost as well.
  5. Let cool, cut into squares.

P.S. Check out Karly. She’s featured in a book! How cool is that?